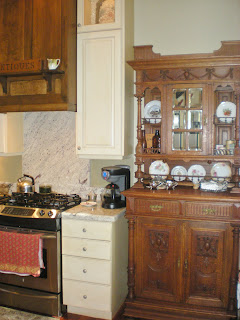
So here we go with the remodel following all the demolition. All the walls needed to be sheetrocked and the ceiling needed to be patched after we installed new water and electrical lines. We also put down a new subfloor and and additional sheets to make it level with the rest of the house.
 |
| New window and reframed east wall |
 |
The corners weren't bad but still not perfectly square. We
built out the window casing and added to the chopped
off window sill. |
 |
| Mudding and sanding |
 |
| Not one of my favorite jobs! |
 |
Priming - just so you know we did most
of the work |
 |
We only painted the exposed areas using three different
colors - wall, backsplash area and ceiling |
 |
Putting the original casing and
and rosettes back up |
 |
| Cutting the vent hole |
 |
Soot because we cut through the original chimney
for the wood stove |
We talked to a number of companies about cabinets and ended up using one that our friends had used, Lone Tree Cabinet in Salt Lake City. They ended up being one of the good guys that we worked with - helpful, knowledgeable, respectful, delivered as promised and went the extra mile in a couple of cases to make sure we were happy. The installers were friendly, hardworking and meticulous in making sure everything was just right.
Victorian kitchens didn't have built-ins but used a variety of stand-alone furniture pieces. We didn't want to be that authentic but still wanted some of that look so they suggested adding touches that would make a few cabinets look more like stand alone pieces. That was done by adding legs, different hardware and finishes.
 |
| Cabinet installation begins 22 months after moving in |
 |
We chose painted cabinets with
an antique finish |
 |
We would have liked inset doors but the cost
was prohibitive |
 |
A 3rd set of lighted cabinets was installed on top for
display since the height made it impractical to use.
I had to hustle one evening to get the lights installed
before they were mounted and enclosed the next day. |
 |
| Opening for refrigerator and microwave |
 |
| Ready for vent hood |
 |
| Beginning to look like a kitchen |
 |
| Adding the crown molding to enclose cabinets |
Originally Chris wanted marble countertops but everyone she talked to said it would be a huge mistake because marble is totally unforgiving - it stains easily, wears poorly and requires constant care. So she spent a long time looking and finally found a piece of granite that has a marble look to it. As it turned out the company we chose, Legacy Granite in Centerville, is only a mile from the house and they did a perfect job. This will be especially evident when we get to the pantry countertops. But again there was a little glitch - their boots and belt buckles damaged several areas of our new cabinets. However our cabinet company made all the repairs and didn't charge us or the other company anything for their work.
 |
| Getting ready for the countertops |
 |
| Installing the granite sill |
 |
| We only had one seam in two rooms with countertops |
 |
| Installing dishwasher lines |
 |
| Time for the garbage disposal |
 |
| Next comes the water purifier |
 |
| Daughter Katie doing trim painting |
 |
| Old but not antique reproduction light fixture |
 |
Antique cabinet we found
on ebay located close to us.
It was cheaper than having
a cabinet built and is the
first thing you see entering
the kitchen |
 |
| The floor got laid 18 months later |
The rest of the photos are of the finished kitchen. Unfortunately it's hard to get a full view of areas so you'll have to be satisfied with partial ones.
 |
This was the wall that was the utility
closet in a former life |
 |
| View from dining room |
 |
The light above the sink was found on
ebay and is a converted gas fixture |
 |
| Our "marble" granite countertops |
 |
The stove vent designed to look like a
separate piece of furniture |
 |
| The sink cabinet with its unique design features |
 |
This was where the bathroom door was. We left the
area above the refrigerator open for
aesthetic purposes |
 |
| This is an antique child's rocking horse from a great-aunt |
 |
Look at the demolition post to see what
this area once looked like |
 |
Lots of lighted display space. We lighted these cabinets,
under the cabinets, added a fixture above the sink,
a central fixture and recessed lighted in the ceiling |
 |
This is the side view of the refrigerator
cabinet with a slide out unit behind |
Many of our purchases were made on ebay. The faucet was last year's model but brand new and half the cost of the big box stores. We also purchased the stainless steel sink, both light fixtures and all the cabinet hardware on ebay as well. We bought our first home in 1973 in an older part of Denver, a small bungalow and I won't tell you how much we paid but I will tell you that even with all our own labor, frugal purchases and cost-cutting efforts this kitchen cost more than our first home. But then most remodelers already know that is often the case. But we are delighted with the finished product and hope you enjoy the tour.


Excellent and helpful post… I am so glad to left comment on this.
ReplyDeleteRemodeling A Kitchen
Remodeling Ideas For Kitchens
Bathroom Remodel
Flooring Installation