We've been told that there was once a barn and other out buildings as part of the farm our home was once the centerpiece of but they've all been long gone and we're surrounded by quarter acre lots filled with 1970's homes. So we had no garage or carriage house like most of the other Victorian homes in our community. In fact I think with one exception we are the only larger home from that era that doesn't still have a carriage house on the property and that one exception has several barns instead. The local carriage houses are all large buildings between 2-4000 square feet.
So when we were deciding on a garage it was important to us to build a structure in keeping with our house and the carriage houses in the community. We spent a lot of time online looking at architectural plans offered by various companies and finally found one suitable for our purposes. We purchased several sets of architectural drawings for $300 which we were then able to present to the city for approval which the city engineer did and we began the push to get our garage built. The garage is 30 feet long, 24 feet wide and has a second floor that is 12 by 30 feet. The first floor is 10 feet high and the second 8 feet.
The first step in the process was to remove a large maple tree located right in the center of where the garage door would be. Our tree guy showed up as promised a few weeks after we moved in and removed the tree in one day except for the stump which we left in order to lever the whole root system out.
 |
| Maple tree - it's larger than it looks |
 |
Taking out branches he ran into a rotten limb filled
with a hornets nest - the first time that's happened
to him in 20 years of tree work |
 |
| Homemade protection |
 |
Just the trunk left - going down 2 feet
at a time. |
 |
| What you get for a 1981 Yamaha 125 |
 |
| A very strong root system |
 |
| Success at last |
 |
| I quit counting rings at 75 |
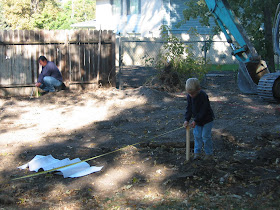
As I shared briefly in an earlier post getting the garage built was one of the more frustrating experiences. At the time we moved in the house had only one closet in an upstairs bedroom so a lot of our stuff was in the backyard under plastic sheeting. We were told the garage would be up within 5 or 6 weeks after we moved in which would have been mid-September. But once the tree was down I couldn't get my friend with the back hoe to return my calls. I had traded him an '81 Yamaha 125 cycle for the backhoe work but it took more than three weeks to get him to come and remove the stump and the final cleanup didn't occur until the first week of September. From there it took another month to get the foundation dug and the footings were poured on October 6. Now we're into it 8 weeks and it's one of the rainiest falls on record and we're constantly recovering all the stuff in the back yard when the wind blows the covers off.
 |
| Excavator with his young helper |
 |
| Finally it looks like something might happen |
 |
| The size of the garage required heavy duty footings |
 |
| Here we are in mid-October |
 |
| The materials arrived on November 4 |
 |
Prefab, engineered trusses - the box is 12' wide, 6'8"
on the sides and 8' in the center. |
On November 8 the framers showed up and
made great progress until it started raining.
They finally finished on the 17th.
 |
A crane was required to lift the trusses
into position. |
 |
We live in earthquake country so even if
our house ends up a pile of rubble we'll be
able to live in the garage because of
its construction |
 |
| The back 11 feet of the garage is my shop |
 |
| A spacious second floor storage area |
 |
| The roofer was on time, fast and efficient |
 |
| Finally buttoned up after 3 or 4 snowstorms |
Once the framing was done the cement contractor moved quickly to get our floor poured before really cold weather set in. He did a great job and we were very pleased with his meticulous approach. Even then we had to wait several weeks for it to cure so it was early December before we actually parked a car in the garage - all this after being told the garage would be done by mid to late September.
But the trials didn't end there. The day after the floor was poured the framers came back to finish the stairs and gouged up the fresh cement before I caught and stopped them. They had been told to wait until they heard from us but their boss came storming over to yell at my wife about their schedule and I ended up firing him when I heard about it. He did offer a weak apology and wanted to finish the job but I had had it with him.
It would have been nice to do an all brick exterior but the cost was prohibitive especially given we were spending more on the garage that we had originally planned. The compromise was to do the front in brick and the the other three walls with Hardiboard. The brick layers started in mid-March and worked through several snow storms while completing the project. Again they were workmen who did a very nice job matching the patterns of the house and staying on the job until it was completed.


Fortunately after firing the framing crew we discovered that we had a man who was currently attending our church who had his own remodeling business in the midwest. His wife was on sabbatical for a year and he followed her to Utah expecting he would find something to keep busy and what he found was us. He installed the garage stairs and finished all the exterior work on the garage but not without some glitches. Just as he was ready to begin the exterior the city inspector came by and tagged us for violating code. Even though we had a permit the city engineer had overlooked the fact that our garage had a second floor and was slightly over 20 feet tall - both violations for out buildings. Everyone at the city offices was very understanding and nice but nevertheless we had to jump through several hoops, request variances, meet with the planning commission and then wait about a month for the final decision which was granted in our favor.
 |
Our "life saver" Jim who spent several
months doing some of the big jobs we
weren't capable of and he was - being 6'8"
and from the big woods |
 |
| Putting up shutters |
 |
| Getting there |
 |
| Finished except for trim on the window |
Once the basic structure was completed we added a wall at the back to separate the cars from my shop area and I wired the garage. We put a 100 amp breaker in the house box we had installed earlier and ran an underground line to the old breaker box I reinstalled in the garage. That way I run a number of circuits and have 220v if I need it for the shop.


